

If the upstairs of your Roseville home always feels warmer than downstairs, here is why uneven cooling happens and what repairs or system changes actually help.
Continue readingIf the upstairs of your Roseville home always feels warmer than downstairs, here is why uneven cooling happens and what repairs or system changes actually help.
Continue reading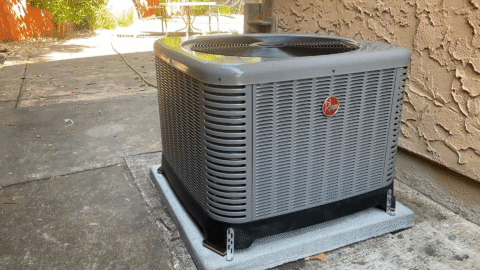
Should you fix your aging air conditioner or replace it? Here is how Roseville homeowners can weigh the choice calmly at the end of cooling season.
Continue reading
Weighing whether to replace your air conditioner now or wait until cooler weather? Here is what actually changes with timing for Roseville homeowners.
Continue reading
Your AC has run hard all summer in Roseville. Here are the late-August warning signs worth acting on now, before the last heat wave of the year hits.
Continue reading
Deciding to replace your air conditioner is the hard part. Once that is settled, most homeowners have a much smaller and more practical question: what actually happens on the day the crew shows up? It is a fair thing to want to know. A crew will be in and out of your house for the better part of a day; there will be equipment on your driveway, and your cooling will be off for several hours. Below is an honest walkthrough of AC replacement in Roseville from arrival to walkthrough, so nothing about the day catches you off guard.
For a straightforward changeout, new condenser outside, new coil and air handler or furnace-mounted coil inside, same location, existing ductwork in good shape, plan on six to eight hours. Most crews arrive in the morning and are finished in the late afternoon. Some jobs run longer, and it is usually for one of these reasons: The indoor unit is in a tight attic or a cramped closet that has to be partially disassembled Electrical work is needed to bring the circuit or disconnect up to current code The line set has to be replaced rather than reused Duct repairs or return-air changes are being done at the same time We are switching system types, such as moving to a heat pump replacement instead of a standard AC If your job is one of the longer ones, you will know that before the day starts, not at four in the afternoon.
Nothing here is complicated, and doing it the night before makes the whole day smoother.
Protecting the house first. Before any tools come out, drop cloths and floor protection go down along the work path and around the equipment. Recovering refrigerant and removing the old system. Refrigerant is legally required to be recovered into a tank rather than vented, and that happens before anything is disconnected. The old condenser, coil and any failed components then come out and go straight onto the truck.
The outdoor pad gets leveled or replaced, the electrical disconnect is checked, and the line set is either flushed or replaced. This is the unglamorous part of the day and the part that determines whether the new system performs like it should. Setting the new equipment. The condenser is set and secured, the indoor coil or air handler is installed and sealed to the plenum, and the condensate drain and safety switch are connected. Brazing, pressure testing, and pulling a vacuum. Connections are brazed, then the system is pressure tested for leaks and evacuated with a vacuum pump to remove moisture and air. Skipping or rushing this step is one of the most common causes of an early compressor failure, which is exactly why we do not rush it.
Refrigerant is weighed in to the manufacturer’s specification, the thermostat is wired and configured, and the system is started for the first time. Testing we run before the AC replacement is done A new system is not finished when it turns on. Before we pack up, we verify it is actually performing: Supply and return temperatures, to confirm the temperature split is where it should be Refrigerant pressures and superheat or subcooling against the manufacturer’s targets Voltage and amp draw on the compressor and blower Airflow and static pressure, which is where duct problems reveal themselves Condensate drainage and the float switch A full cooling cycle from thermostat call to shutdown If a number is off, we correct it that day.
Before the crew leaves, someone should walk you through your own system. That means showing you the new thermostat and how to program it, where the filter goes, what size it is and how often to change it, what the outdoor unit needs to stay clear of, and what sounds are normal in the first week. You should also leave the day with your model and serial numbers, your registered manufacturer warranty, your labor warranty terms, and the permit and inspection information for the work. Keep that paperwork somewhere you can find it in five years, because warranty claims always ask for it.
Rebates and utility incentives are worth asking about while the paperwork is fresh — the financing and rebates options on our site outline what is currently available, and current special offers sometimes apply to new installations.
The first week after an AC replacement A new system will feel different, and most of it is normal. You may notice a faint smell from new components the first few cycles, longer and gentler run times if you moved to a variable-speed or two-stage system, and different airflow at the registers.
What is not normal:
Water anywhere near the indoor unit, a breaker that trips, ice on the refrigerant lines, or a system that runs continuously without reaching your setpoint. Call us if you see any of those — it is far easier to adjust something in week one than to discover it next July.
Also change the filter on schedule from the start. A restricted filter on brand new equipment causes the same problems it caused on your old system, and enrolling in a maintenance plan keeps the warranty requirements and the seasonal checkups from falling off your calendar. Schedule your AC replacement in Roseville
We have been installing and servicing systems in Roseville since Ray O. Cook started this company out of his garage in 1947, and an install day is where that experience is most visible — in the prep work, the pressure test, and the numbers we check before we leave. If you are weighing whether it is time, our guide to AC repair versus replacement is a good place to start. When you are ready, call (916) 237-9037 or schedule an appointment online, and we will look at your home, size the system properly, and tell you exactly what your install day would look like.

Heat pumps are crucial for maintaining indoor comfort while promoting energy efficiency in homes. This guide is designed to help homeowners navigate the complexities of heat pump installation and replacement, addressing their importance, selection criteria, and long-term maintenance. With rising energy costs and the demand for sustainable solutions, understanding the mechanisms of heat pumps and their benefits is essential for homeowners seeking reliable and cost-effective heating solutions. Throughout this article, you will learn about key factors influencing your decision, including energy efficiency, local rebates, and the importance of professional installation services by trusted providers like Ray O Cook Heating and Air.
Heat pump replacement is essential when systems show signs of inefficiency, unsafe operation, or failure to meet heating and cooling demands. Indicators that a heat pump needs replacement include high energy costs, inconsistent temperature regulation throughout the home, and the age of the unit, typically exceeding 10-15 years. Failing to address these issues may lead to more significant energy waste and high repair costs. Therefore, recognizing these symptoms promptly can save homeowners both time and money, ensuring optimal comfort year-round.

Selecting the right heat pump involves several critical considerations to ensure optimal performance and efficiency in your home. Understanding your home size and layout is paramount; larger spaces often require heat pumps with more capacity. Additionally, homeowners should consider the types of heat pumps available, such as air-source heat pumps, ductless mini-splits, or geothermal systems. Energy efficiency ratings, represented by SEER and HSPF, can further guide your decision, as higher ratings equate to more efficient systems, leading to cost savings over time.
Professional heat pump installation plays a crucial role in the performance and longevity of heat pumps. Correct sizing of the unit is vital for effective operation and optimal energy efficiency. Ensuring compliance with local codes and regulations during installation also protects homeowners from legal liabilities. Moreover, professional installation often comes with warranty protection, safeguarding your investment and offering peace of mind. Ray O. Cook Heating and Air specializes in providing expert installation services, ensuring that your heat pump operates at peak efficiency.
Proper maintenance is essential for extending the life of your heat pump. Regular practices include:
Filter Changes: Changing filters every 1-3 months ensures consistent airflow and system efficiency.
Professional Tune-Ups: Annual inspections by professionals can identify potential issues before they become significant problems.
Coil Cleaning: Keeping coils clean helps maintain efficiency and prolongs the system’s lifespan.
These maintenance practices are not only important for performance but can also prevent costly repairs and reduce energy consumption over time.
Heat pumps provide an energy-efficient alternative to traditional heating systems, often reducing energy consumption by up to 50%. Utilizing heat pumps can significantly lower monthly utility bills and enhance overall home comfort. Homeowners are often eligible for local rebates and incentives that can lower installation costs, making this a financially attractive option. By investing in a heat pump now, you not only increase energy efficiency but also enjoy long-term savings on energy bills. For assistance with installations or to request a free estimate, Ray O. Cook Heating and Air is available to help navigate available options.

When planning for heat pump replacement, homeowners should assess their budget, evaluate local climate factors, and think about future heating and cooling needs. Budget considerations involve not only the initial purchase and installation costs but also ongoing maintenance and energy bills. Local climate affects the efficiency of different heat pump types; for instance, air-source systems work well in moderate climates, while geothermal systems may be more advantageous in extreme temperatures. Furthermore, anticipating future needs, such as additional square footage or lifestyle changes, can help ensure that the selected system remains effective over time.


